This article provides step-by-step instructions on how to create Azure Blob storage in the Azure portal. Azure Blob Storage, a reliable and secure cloud-based service offered by Microsoft, is a superior solution for storing a wide variety of objects. With its advanced capabilities, it can effectively manage vast amounts of unstructured data, including binary and text data. Users can confidently store and easily manage their data using Azure Blob Storage without having to stress about the complexities of data management.
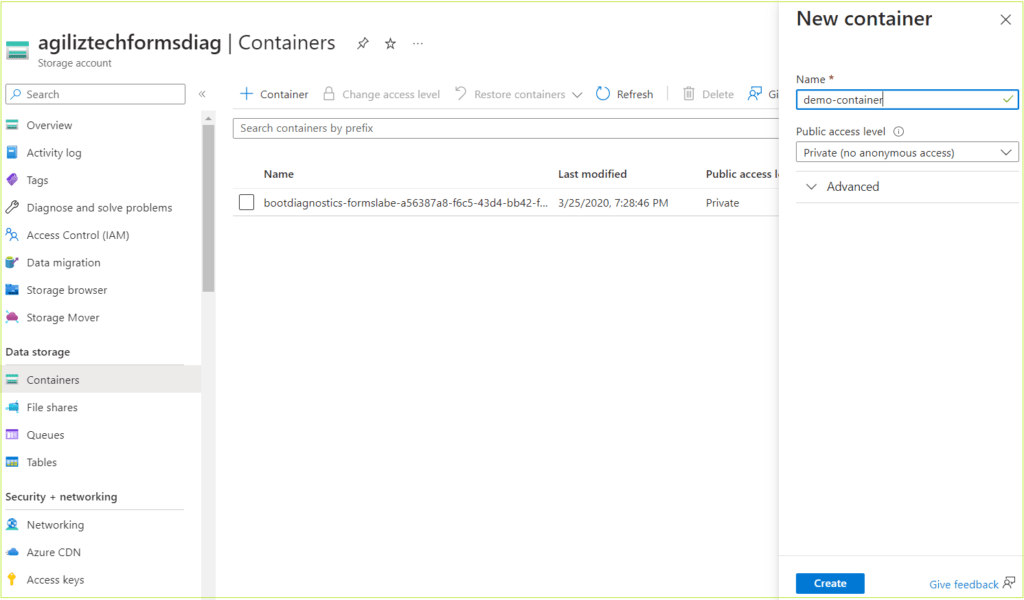
In the left pane, under Data storage, click containers. The Containers pane appears.
Click + Container. The New container blade appears.
In the Name box, type a name for the container.
In the Public access level list box, choose Private (no anonymous access) and then click Create.
The container you created appears in the list of containers.
Take the Next Step: Embrace the Power of Cloud Services
Ready to take your organization to the next level with cloud services? Our team of experts can help you navigate the cloud landscape and find the solutions that best meet your needs. Contact us today to learn more and schedule a consultation.
The Azure VPN (Virtual private network) Gateway is a service that utilizes a distinct form of virtual network gateway to transmit encrypted traffic between an Azure virtual network and on-premises locations through the public Internet. One can utilize VPN Gateway for sending encrypted traffic between Azure virtual networks through the Microsoft network. This article provides step-by-step instructions on creating Azure VPN gateway.
In the Search box, search for Virtual network gateway.
The Virtual network gateway pane appears.
Under Virtual network gateway, click Create.
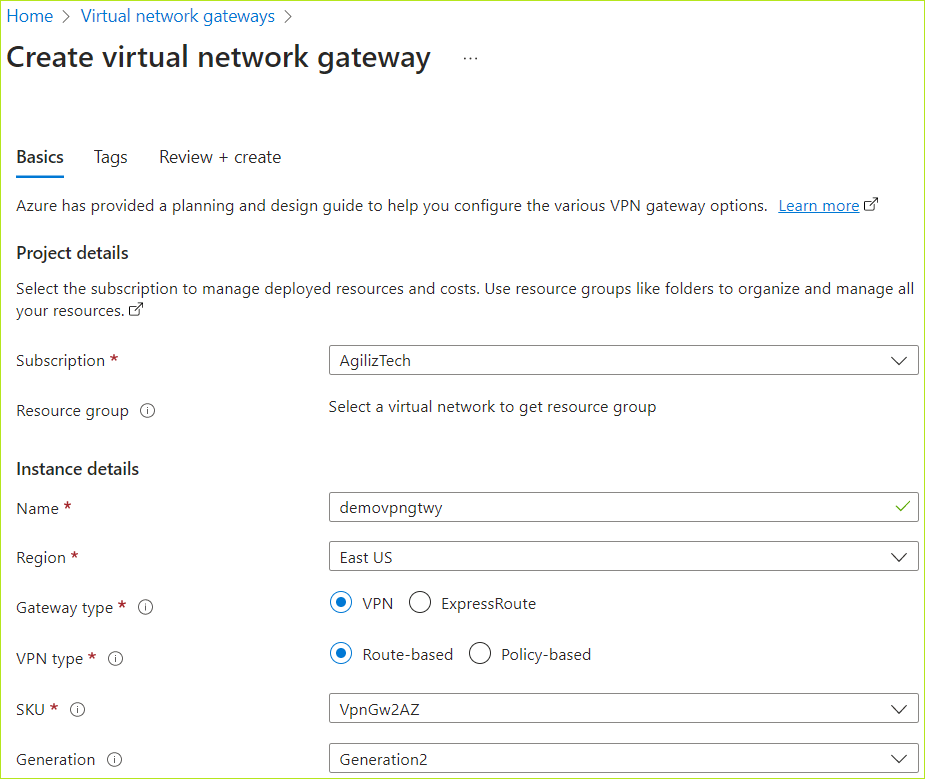
The Create virtual network gateway pane appears.
Basics
You can use the Basics pane to configure Project details and instance details.
Under Project details, do the following.
In the Subscriptions list, choose the subscription.
Under Instance details list, do the following.
In the Name box, type a name for the VPN gateway.
In the Region list, choose a region.
For Gateway type options, click VPN.
For VPN type options, click Route-based.
In the SKU list, choose the required SKU.
In the Generation list, choose the required generation.
In the Virtual network list, choose the required virtual network.
In the Gateway subnet address range list, choose the required subnet address.
Under Public IP address, do the following:
For the Public IP address, choose Create new
In the Public IP address box, enter a public IP address name.
In the Availability zone list, choose the required zone.
For Enable active-active mode, choose Enabled
Under Second public IP address, do the following:
For the Public IP address, choose Create new
In the Public IP address box, enter a public IP address name.
In the Availability zone list, choose the required zone.
For Configure BGP, choose Disabled
Click Next : Tags >.
The Tags pane appears.
Tags
In the Name and Value boxes, enter the name and value.
Click Next : Review + create >.
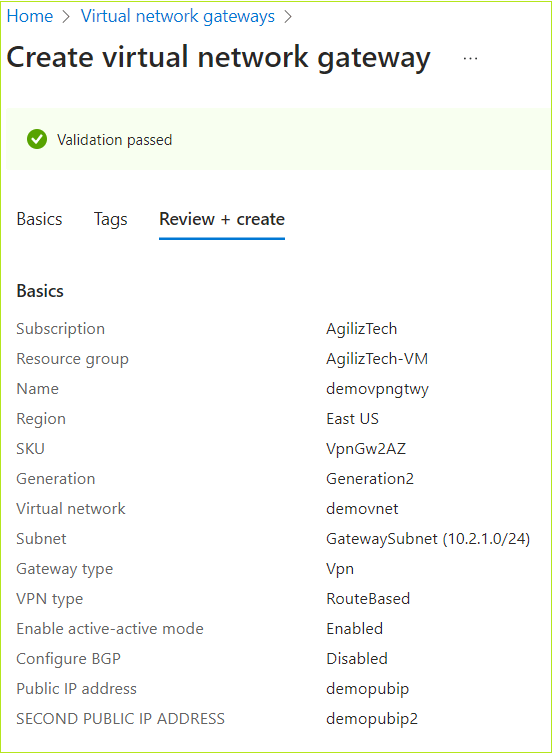
The Review + create pane appears.
Review + create
Once the validation is passed, click Create.
The newly created Virtual network gateway appears in Virtual network gateway pane.
Take the Next Step: Embrace the Power of Cloud Services
Ready to take your organization to the next level with cloud services? Our team of experts can help you navigate the cloud landscape and find the solutions that best meet your needs. Contact us today to learn more and schedule a consultation.
This section provides step-by-step instructions on how to create an Azure SQL database.
Azure SQL Database is a comprehensive platform as a service (PaaS) database engine that takes care of various database management functions, including upgrading, patching, backups, and monitoring, without requiring user intervention. It operates on the latest stable version of the SQL Server database engine and patched OS, ensuring 99.99% availability at all times.
In the Search box, search for SQL database. The SQL databases pane appears.
Under SQL databases, click Create.
The Create SQL database pane appears.
Basics
You can use the Basics pane to create SQL database with your preferred configurations.
To configure basics
Under Project details, do the following:
In the Subscription list, choose the required subscription.
In the Resource group list, choose the required resource group.
If you do not have one, click Create new, enter the name, and click OK.
Under Database details, do the following:
In the Database name box, type database name.
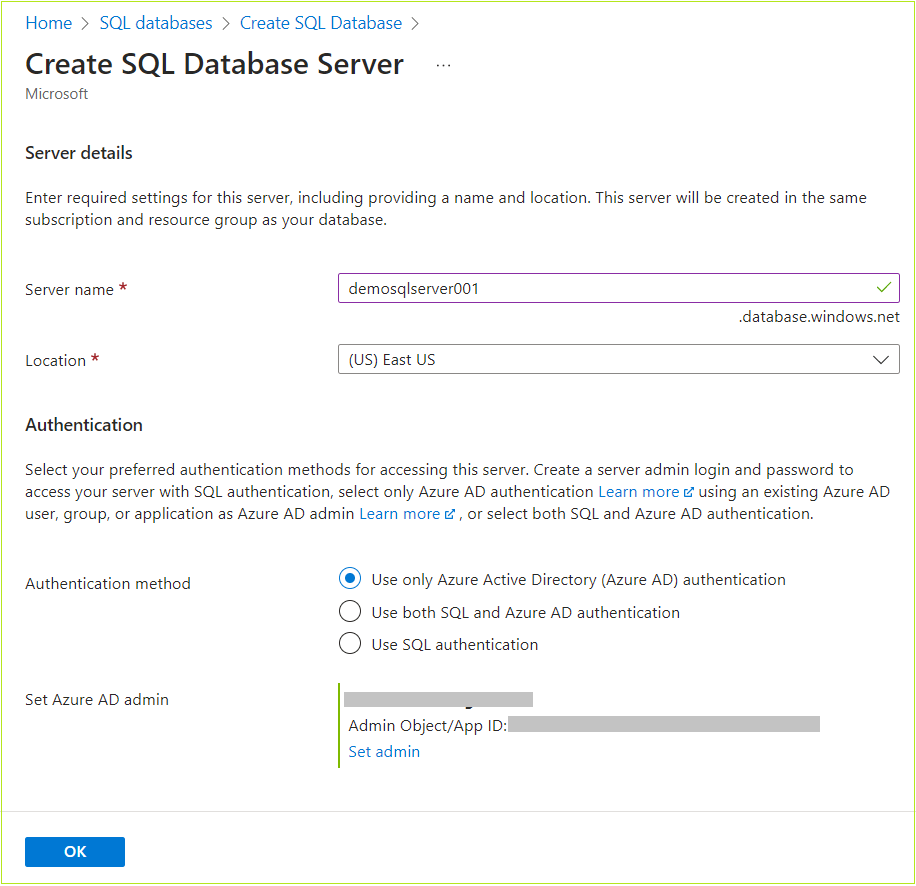
In the Server list, click Create new.
The Create SQL Database server pane appears.
Under Server details, in the Server name box, type a server name.
In the Location list, choose the default location.
Under Authentication, for Authentication method option, choose the required authentication.
Click OK.
The Create SQL Database – Basics pane appears.
Under Backup storage redundancy, click the required option.
Click Next : Networking >.
The Networking pane appears.
Networking
You can use the Networking pane to configure network connection and connection policy.
To configure Networking
Under Network connectivity, click the required connectivity method.
Under Connection policy, click required policy.
Under Encrypted connections, in the Minimum TLS version list, choose the required TLS version.
Click Next : Security >.
The Security pane appears.
Security
You can use the Security pane to configure the following:
To configure Security
Choose the required options in the Security
Microsoft Defender for SQL: Whether to enable Microsoft defender for SQL.
Ledger: Allows you to configure ledger.
Identity: Allows you to configure identities.
Transparent data encryption: Allows you to configure transparent data encryption.
Click Next : Additional settings.
The Additional settings pane appears.
Additional settings
You can use the Additional settings pane to configure parameters including database collation and maintenance window.
To configure additional settings
Choose the required options or continue with the default values.
Click Next : Tags>.
The Tags pane appears.
Tags
To create tags
In the Name box, enter a name for the tag.
In the Value box, enter a value.
Choose the number of resources from the Resource.
Click Next : Review + create >.
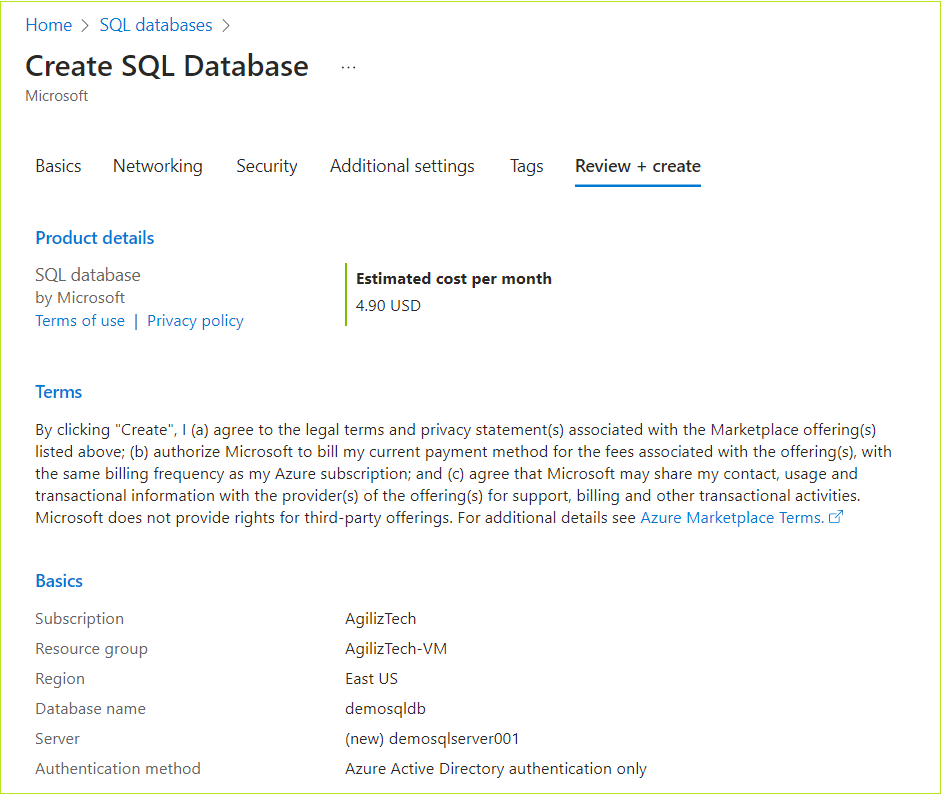
The Review + create pane appears.
Review + create
Review all the SQL database configuration details and create.
Review the details of the SQL database configuration and then click Create.
The newly created SQL database appears in the SQL databases pane.
Take the Next Step: Embrace the Power of Cloud Services
Ready to take your organization to the next level with cloud services? Our team of experts can help you navigate the cloud landscape and find the solutions that best meet your needs. Contact us today to learn more and schedule a consultation.
Creating an Azure Virtual Machine with SQL is necessary to fully leverage the benefits of both Azure VMs and SQL Server. Azure VMs offer unparalleled flexibility and scalability that can be finely tuned to meet your computing needs. On the other hand, SQL Server delivers an extremely resilient and reliable database management system that empowers you to store, manage, and analyze data effectively.
To create an Azure virtual machine with SQL in the Azure portal
Sign in to the Azure Portal account where VM needs to be created.
The Azure Portal Home pane appears.
In the Search box, search for SQL virtual machine.
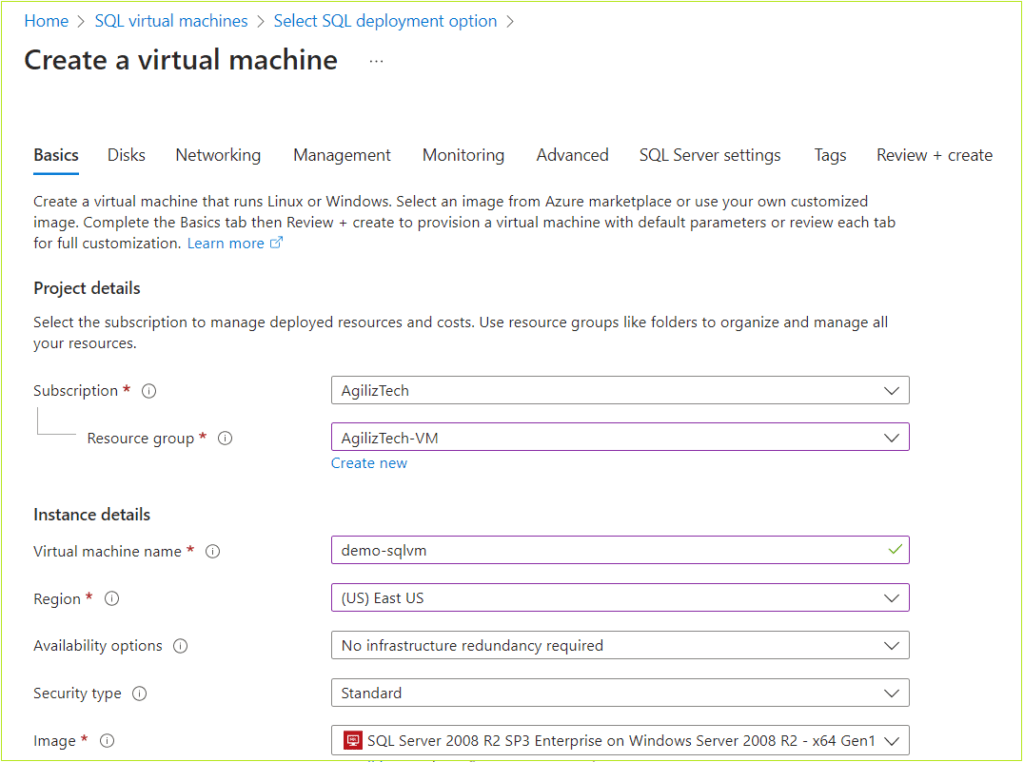
Under SQL virtual machines, in the Image list box, choose the required image for the virtual machine and click Create. The Create virtual machine pane appears.
Basics
You can use Basics pane to add project details, instance details, create administrator account, and Inbound port rules.
Under Project details, do the following:
In the Subscription list, choose the required subscription.
In the Resource group list, choose the required resource group.
If you do not have one, click Create new, enter the name, and click OK.
Under Instance details, do the following:
In the Virtual machine name box, type virtual machine name.
In the Region list, choose the required region.
In the Availability options list, choose the required option.
In the Security type list, choose the required security. The default security type is Standard.
In the Image list, choose the required Windows image.
For the VM architecture, click the required option.
For Run with Azure Spot discount, select the checkbox if you need a spot discount. Click the information icon for more details on the spot discount.
In the Size list, choose the required VM size. If you want to see all sizes, click See all sizes to compare the sizes and prices.
Under the Administrator account, do the following:
In the Username box, type username.
In the Password box, type a strong password.
In the Confirm password box, retype the password to confirm.
Under Inbound port rules, do the following:
For Public inbound ports, click Allow selected ports.
In the Select inbound ports list, choose RDP (3389) port.
Under Licensing, leave the checkbox unselected.
Click Next: Disks. The Disks pane appears.
Disks
You can use Disks pane to select the disk type, size and other details.
To configure disks
Under VM disk encryption, leave the VM disk encryption checkbox unselected.
Under the OS disk, do the following:
In the OS Disk type list, choose Premium SSD (locally-redundant-storage).
Select the Delete with VM checkbox.
In the Key management list, choose Platform-managed key.
Leave the Enable Ultra Disk compatibility checkbox unselected.
Click Next : Networking >. The Networking pane appears.
Networking
You can use networking pane to add virtual network, subnet, public IP, network security group and other details. Azure automatically creates a network interface when creating a VM.
To add details in the networking pane
Under Network interface, do the following:
In the Virtual network list, choose a virtual network.
In the Subnet list, choose the default subnet.
In the Public IP list, choose the public IP.
For NIC network security group option, click Basic.
For Public inbound ports option, click Allow selected ports.
In the Select inbound ports list, choose RDP (3389).
Select the Delete public IP and NIC when VM is deleted checkbox.
Leave the Load Balancing section to its default value.
Click Next : Management >.
The Management pane appears.
Management
You can use Management pane to enable auto-shutdown and select OS updates option.
To set up management
Under Auto-shutdown, do the following:
Select Enable auto-shutdown checkbox.
In the Shutdown time box, enter the timings.
In the Time zone list, choose the required time zone.
Under Guest OS updates, in the Patch orchestrationoptions list, choose Automatic by OS (Windows Automatic Updates).
Click Next : Monitoring >.
The Monitoring pane appears.
Monitoring
You can use the Monitoring pane to set up alert rules and diagnostic settings. By default, boot diagnostic is enabled with a managed storage account.
To configure alerts and diagnostics
Under Alerts, select Enable recommended alert rules
Under Diagnostics, click the required option.
Click Next : Advanced >. The Advanced pane appears.
Advanced
You can use the Advanced pane to install VM applications, add custom data, user data and other advanced settings.
In the Advanced pane, choose the required options and click Next : Tags >. The Tags pane appears.
SQL Server settings
You can use the SQL Server settings to set up SQL authentication, Security and networking, SQL instance settings, and others.
In the SQL Server settings pane, either go with the default values or choose the required settings for the following:
Security and Networking: Choose the SQL connectivity and port.
SQL Authentication: Enable or disable SQL authentication and Azure key vault integration.
Storage Configuration: Go with the default configuration.
SQL instance settings: Go with the default configuration.
SQL Server license: Choose either default option No or Yes, if you have a SQL server license.
Automated patching: Change configuration for patching if required.
Automated backup and R Services: Default values
Click Next : Tags >.
The Tags pane appears.
Tags
Enter a name for the tag in the Name box.
In the Value box, enter a value.
Choose the number of resources from the Resource list box.
Click Next : Review + create >. The Review + create pane appears.
Review + create
Once the validation is passed, review the VM details and click Create.
Take the Next Step: Embrace the Power of Cloud Services
Ready to take your organization to the next level with cloud services? Our team of experts can help you navigate the cloud landscape and find the solutions that best meet your needs. Contact us today to learn more and schedule a consultation.
Create an Azure Virtual Network in the Azure Portal
Azure Virtual Network enables you to securely connect and communicate between various Azure resources, such as virtual machines (VMs), virtual machine scale sets, Azure Kubernetes Service (AKS) clusters, and other services within the Azure ecosystem. This article provides step-by-step instructions on how to create an Azure Virtual Network.
To create an Azure virtual network
In the Search box, search for Virtual network. The Virtual network list pane appears.
In the Virtual network pane, click Create. The Create a virtual network pane appears.
Basics
Under Project details, do the following.
In the Subscription list, choose the required subscription.
In the Resource group list, choose the required resource group.
If you do not have one, click Create new, type a name, and click OK.
Under Instance details, do the following:
In the Virtual network name box, type a name for the virtual network.
In the Region list, choose the required region.
Click Next.
The Security pane appears.
Security
In the Security pane, go with the default values or select the required configurations for the following:
Azure Bastion
Azure Firewall
Azure DDoS Network Protection
Click Next.
The IP address pane appears.
IP address
In IP address pane, Azure provides a default subnet with IP address range.
To add an IP address space, click Add an IP address space, provide the required IP address.
To add a subnet, click + Add a subnet.
Click Next.
The Tags pane appears.
In the Tags pane, if required, do the following:
In the Name box, enter a name for the tag.
In the Value box, enter a value.
Choose the number of resources in the Resource list.
Click Review + create >.
The Review + create pane appears.
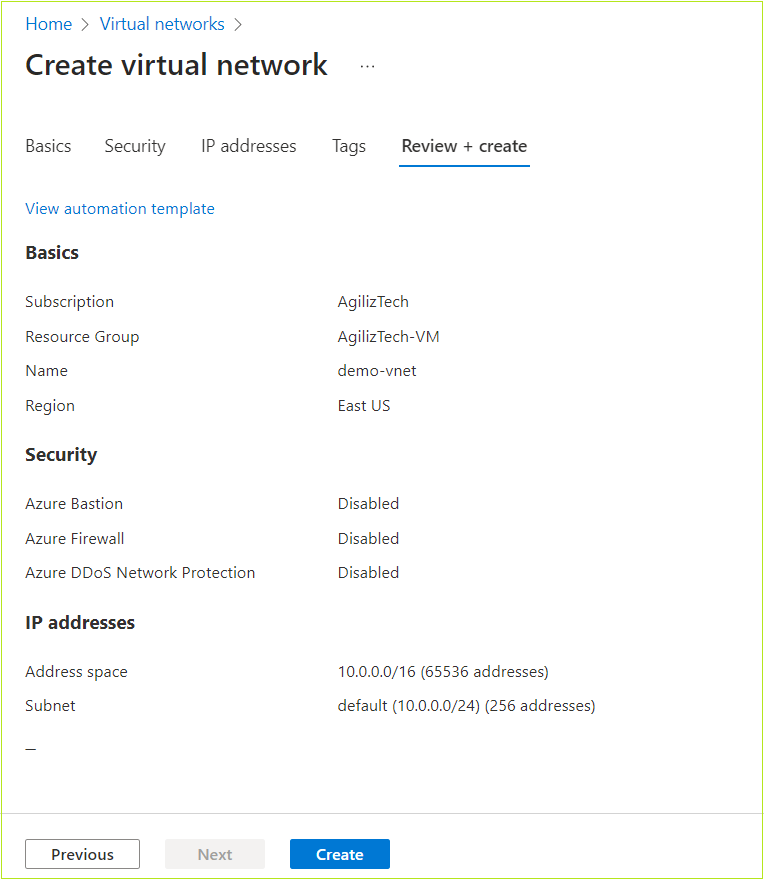
Review + create
In the Review + create pane, review the details of the virtual network, and then click Create.
The new virtual network appears in the virtual network pane.
Take the Next Step: Embrace the Power of Cloud Services
Ready to take your organization to the next level with cloud services? Our team of experts can help you navigate the cloud landscape and find the solutions that best meet your needs. Contact us today to learn more and schedule a consultation.
This article provides step-by-step instructions for attaching a new data disk to an Azure virtual machine (VM) using the Azure portal. Note that the number of data disks you can attach depends on the size of your VM.
In the Search box, search for Virtual machines. The Virtual machine pane appears.
Choose a virtual machine from the list.
In the Virtual machine pane, under Settings, click Disks. The Disks pane appears.
To create and add a new data disk to VM, under Data disks, click Create and attach a new disk.
In the dropdown boxes for the new disk, Specify the disk details, such as disk name, size, storage account, caching preferences, and disk type.
Click Save to create and attach the new data disk to the VM.
The New data disk is attached to the VM.
Take the Next Step: Embrace the Power of Cloud Services
Ready to take your organization to the next level with cloud services? Our team of experts can help you navigate the cloud landscape and find the solutions that best meet your needs. Contact us today to learn more and schedule a consultation.
Create Network Security Group (NSG) and Associate a Subnet
Creating Network Security Group
Azure Network Security Group (NSG) is a fundamental component of Azure’s network security offering, providing a flexible and scalable way to control traffic flow to and from Azure resources. It acts as a virtual firewall that filters network traffic at the subnet or virtual machine level based on user-defined rules.
To create a network security group in the Azure portal
In the Search box, search for Network Security Group. The Network security group pane appears.
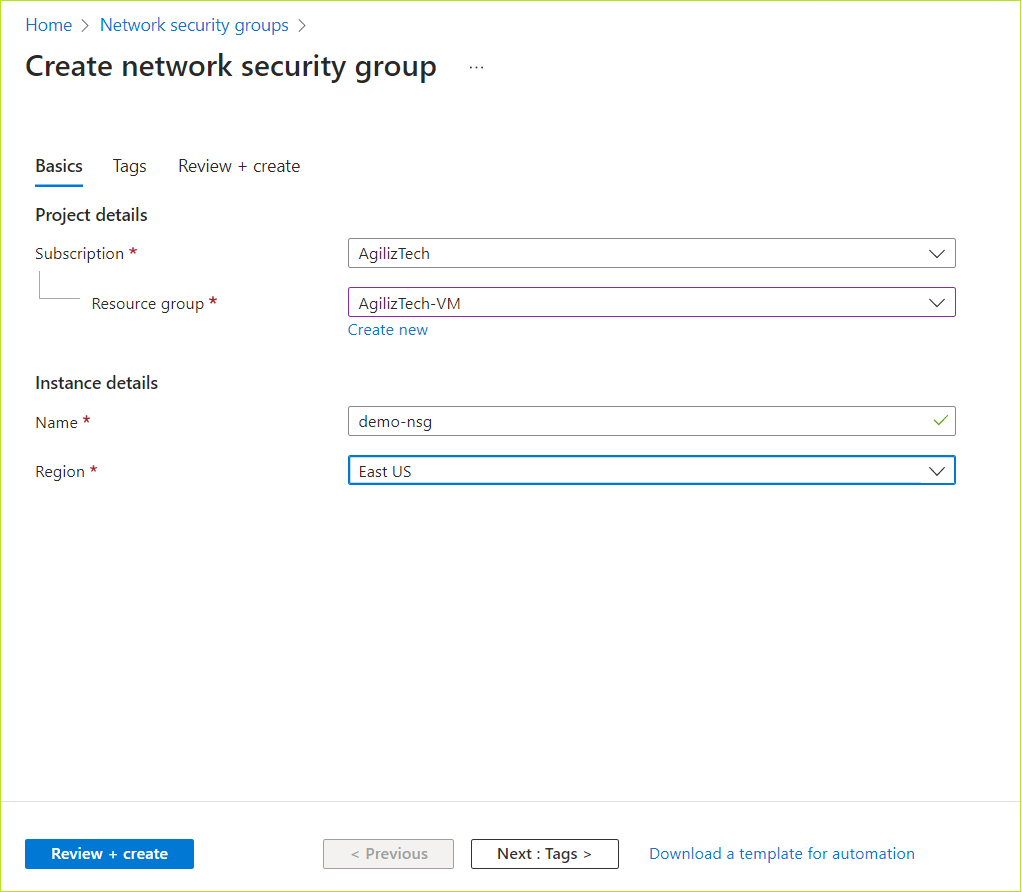
Click + Create. The Create network security group pane appears.
In the Basics pane, under Project details, do the following:
In the Subscription list box, choose the required subscription.
In the Resource group list box, choose the required resource group.
If you do not have one, click Create new, enter the name, and click OK.
Click Next : Tags >. The Tags pane appears.
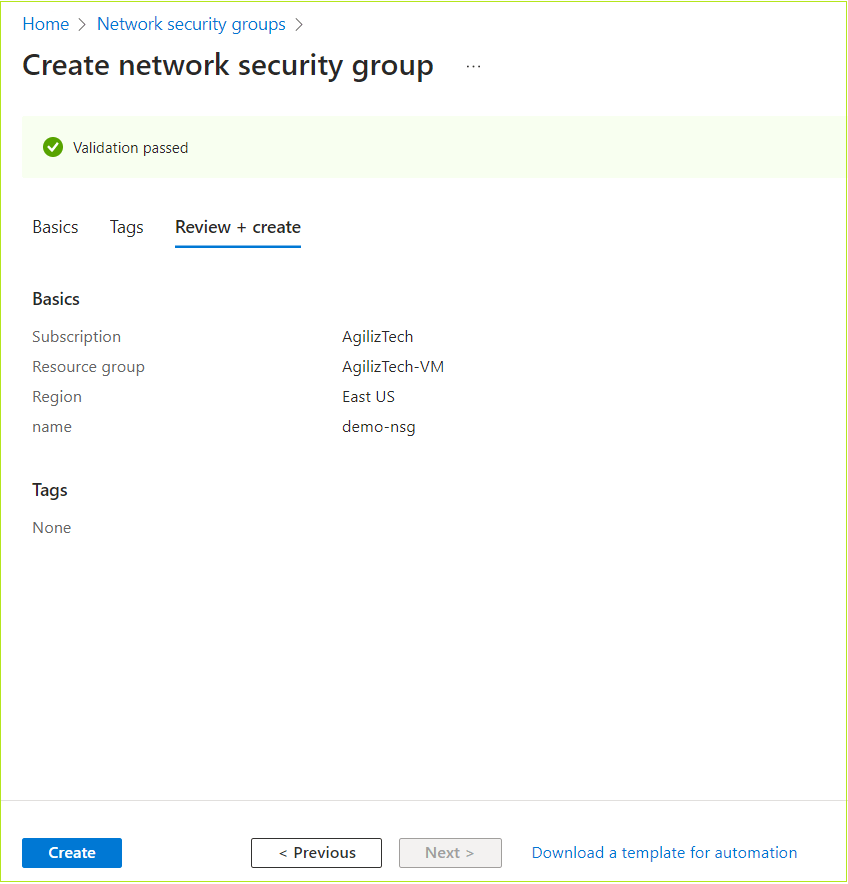
In the Tags pane, type the name and value in the respective boxes, and then click Review + create.
The Review + create pane appears.
Once the validation is passed, click Create.
The new Network security group appears in the Network security group pane.
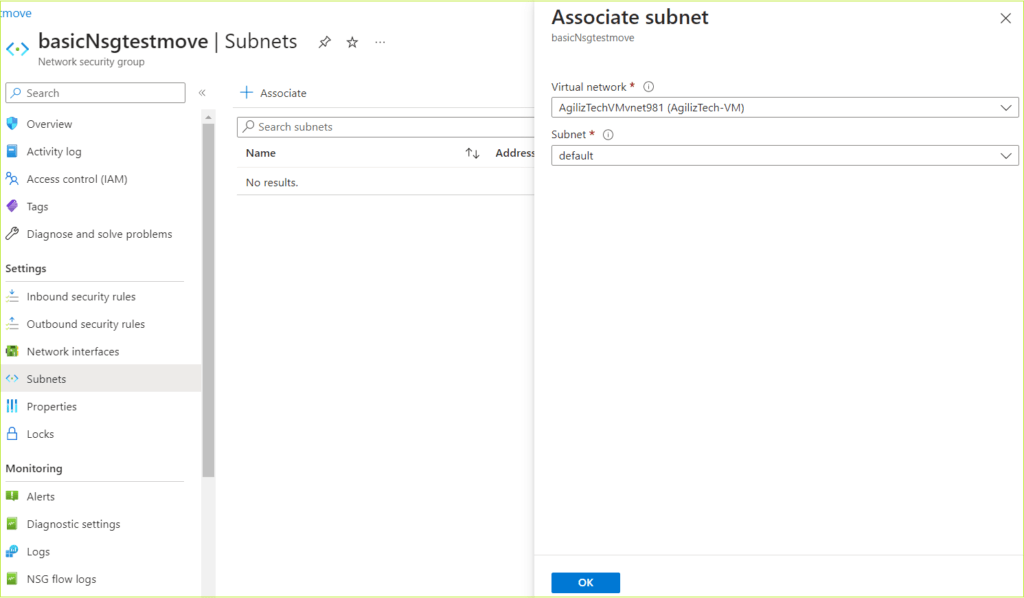
Associating NSG to Subnet
Security rules within network security groups filter network traffic based on IP address, port, and protocol. When a subnet is associated with a network security group, the security rules are enforced on resources deployed in that particular subnet. To associate NSG to a subnet in the Azure portal, follow the instructions:
In the Search box, search for Network Security Group. The Network security group pane appears.
Choose the required NSG to associate a subnet.
In the left pane, under Settings, click Subnet. The Subnets pane appears.
Click + Associate. The Associate pane appears.
In the Virtual network and Subnet list box, choose the required virtual network and subnet respectively.
Click OK.
The associated subnet appears in the Subnets pane.
Take the Next Step: Embrace the Power of Cloud Services
Ready to take your organization to the next level with cloud services? Our team of experts can help you navigate the cloud landscape and find the solutions that best meet your needs. Contact us today to learn more and schedule a consultation.
With a virtual machine on Azure, you can enjoy the benefits of virtualization without investing in and managing the hardware that powers it. Nonetheless, it is essential to maintain the virtual machine by setting it up, updating it, and installing the necessary software. There are four methods to create a VM, including Azure Portal, PowerShell, Rest API, or Azure CLI, but the most recommended option is the Azure Portal.
To create an Azure virtual machine in the Azure portal
Sign in to the Azure Portal account where VM needs to be created.
The Azure Portal Home pane appears.
Under Azure Services, click Create a Resource.
The Create a resource pane appears.
Under Virtual machine, click Create.
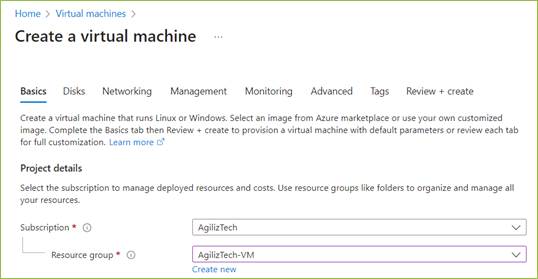
The Create a virtual machine pane appears.
Basics
You can use Basics pane to add project details, instance details, create administrator account, and Inbound port rules.
Under Project details, do the following:
In the Subscription list, choose the required subscription.
In the Resource group list , choose the required resource group.
If you do not have one, click Create new, enter the name, and click OK.
Under Instance details, do the following:
In the Virtual machine name box, type virtual machine name.
In the Region list, choose the required region.
In the Availability options list, choose the required option.
In the Availability zone list, choose the required zone. You can select multiple zones and it creates VM for each zone.
In the Security type list, choose the required security. The default security type is Standard.
In the Image list, choose the required Windows image.
For the VM architecture, click the required option.
For Run with Azure Spot discount, select the checkbox if you need a spot discount. Click the information icon for more details on the spot discount.
In the Size list, choose the required VM size. If you want to see all sizes, click See all sizes to compare the sizes and prices.
Under the Administrator account, do the following:
In the Username box, type username.
In the Password box, type a strong password.
In the Confirm password box, retype the password to confirm.
Under Inbound port rules, do the following:
For Public inbound ports, click Allow selected ports.
In the Select inbound ports list, choose RDP (3389) port.
Under Licensing, leave the checkbox unselected.
Click Next: Disks. The Disks pane appears.
Disks
You can use Disks pane to select the disk type, size and other details.
To configure disks
Under VM disk encryption, leave the VM disk encryption checkbox unselected.
Under the OS disk, do the following:
In the OS Disk type list, choose Premium SSD (locally-redundant-storage).
Select the Delete with VM checkbox.
In the Key management list, choose Platform-managed key.
Leave the Enable Ultra Disk compatibility checkbox unselected.
Click Next : Networking >. The Networking pane appears.
Networking
You can use networking pane to add virtual network, subnet, public IP, network security group and other details. Azure automatically creates a network interface when creating a VM.
To add details in the networking pane
Under Network interface, do the following:
In the Virtual network list, choose a virtual network.
In the Subnet list, choose the default subnet.
In the Public IP list, choose the public IP.
For NIC network security group option, click Basic.
For Public inbound ports option, click Allow selected ports.
In the Select inbound ports list, choose RDP (3389).
Select the Delete public IP and NIC when VM is deleted checkbox.
Leave the Load Balancing section to its default value.
Click Next : Management >.
The Management pane appears.
Management
You can use Management pane to enable auto-shutdown and select OS updates option.
To set up management
Under Auto-shutdown, do the following:
Select Enable auto-shutdown checkbox.
In the Shutdown time box, enter the timings.
In the Time zone list, choose the required time zone.
Under Guest OS updates, in the Patch orchestrationoptions list box, choose Automatic by OS (Windows Automatic Updates).
Click Next : Monitoring >.
The Monitoring pane appears.
Monitoring
You can use the Monitoring pane to set up alert rules and diagnostic settings. By default, boot diagnostic is enabled with a managed storage account.
To configure alerts and diagnostics
In the Monitoring pane, under Alerts, select Enable recommended alert rules
Under Diagnostics, click the required option.
Click Next : Advanced >. The Advanced pane appears.
Advanced
You can use the Advanced pane to install VM applications, add custom data, user data and other advanced settings.
In the Advanced pane, choose the required options and click Next : Tags >. The Tags pane appears.
Tags
In the Tags pane, enter a name for the tag in the Name box.
In the Value box, enter a value.
Choose the number of resources from the Resource list box.
Click Next : Review + create >. The Review + create pane appears.
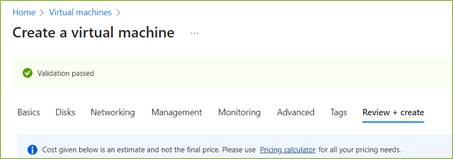
Review + create
Once the validation is passed, review the VM details and click Create.
Take the Next Step: Embrace the Power of Cloud Services
Ready to take your organization to the next level with cloud services? Our team of experts can help you navigate the cloud landscape and find the solutions that best meet your needs. Contact us today to learn more and schedule a consultation.
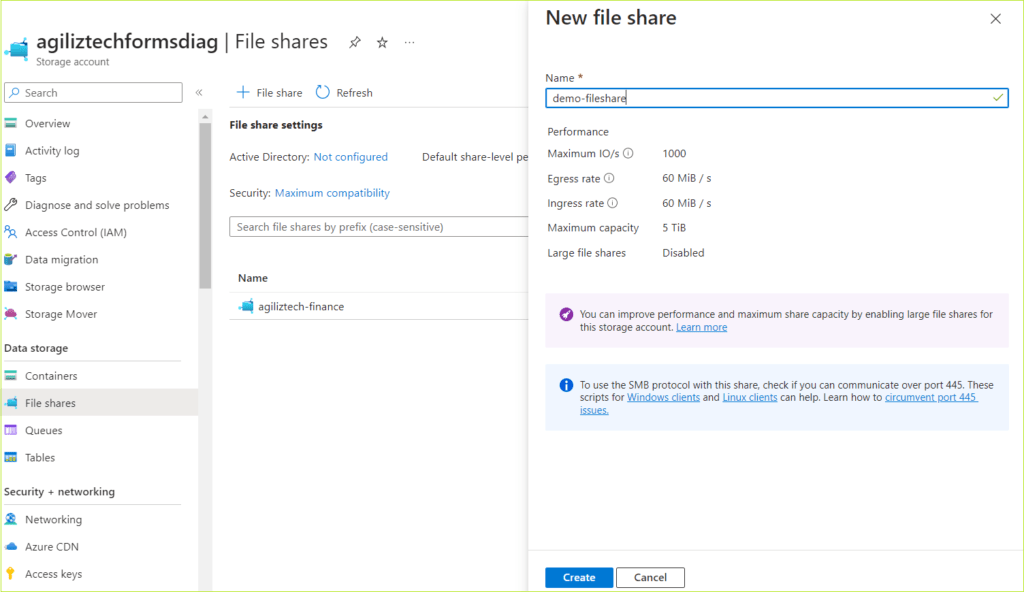
Discover the simple steps to easily mount Azure file shares on Windows, Linux, and macOS like a pro. This article will show you how to create an SMB Azure file share using the Azure portal. The instructions are easy to follow and will help you complete the task easily.
In the left pane, under Data storage, click File Shares. The File shares pane appears.
Click + File share. The New file share pane appears.
In the Name box, type a name for the file share and click Create.
You have successfully created a new file share and it appears in the File Shares pane.
Take the Next Step: Embrace the Power of Cloud Services
Ready to take your organization to the next level with cloud services? Our team of experts can help you navigate the cloud landscape and find the solutions that best meet your needs. Contact us today to learn more and schedule a consultation.
Microsoft has recently announced a new feature for its Microsoft 365 suite of productivity apps: Copilot. Copilot is an AI-powered assistant that helps you write, create, communicate, and collaborate more effectively and efficiently. Copilot leverages the power of large language models (LLMs) and your data in the Microsoft Graph to understand your context, intent, and preferences, and to generate relevant suggestions, insights, and actions.
Copilot is integrated into Microsoft 365 in two ways:
– It works alongside you, embedded in the Microsoft 365 apps you use every day — Word, Excel, PowerPoint, Outlook, Teams and more — to unleash creativity, unlock productivity and uplevel skills.
For example, Copilot can help you write better emails by suggesting subject lines, salutations, sign-offs, and follow-ups; it can help you create engaging presentations by suggesting layouts, designs, images, and animations; it can help you analyze data by suggesting charts, formulas, and insights; it can help you communicate more effectively by suggesting responses, emojis, and translations; it can help you collaborate more smoothly by suggesting tasks, reminders, and meetings.
– It also offers an entirely new experience: Business Chat. Business Chat is a conversational interface that works across all your data and apps in Microsoft 365. You can simply type or speak what you want to do or know in natural language, and Copilot will understand your query and provide relevant information or actions in a chat-like format.
For example, you can ask Copilot to show you your latest sales report or to schedule a meeting with your team or to find a document related to a project or to summarize an article for you.
Copilot is not only smart but also secure and trustworthy. Copilot is integrated into Microsoft 365 and automatically inherits all your company’s valuable security, compliance, and privacy policies and processes. Two-factor authentication, compliance boundaries, privacy protections, and more make Copilot the AI solution you can trust.
Copilot also respects your preferences and feedback and learns from your behavior to provide ersonalized and relevant suggestions.
Microsoft 365 Copilot is currently being tested with a limited number of people and the company plans to open its doors to a wider audience in the coming months.
Microsoft 365 Copilot is a game-changer for productivity and innovation. It combines the best of human intelligence and artificial intelligence to help you achieve more with less effort. With Copilot as your copilot for work, you can focus on what matters most: your ideas, your goals, your impact.
Take the Next Step: Embrace the Power of Cloud Services
Ready to take your organization to the next level with cloud services? Our team of experts can help you navigate the cloud landscape and find the solutions that best meet your needs. Contact us today to learn more and schedule a consultation.